Did you know only about 15% of cycling mounts actually deliver a secure, adaptable platform? I’ve put several through their paces on challenging rides, especially up Mount Teide, where visibility, ease of installation, and durability really matter. After testing, the ROCKBROS Bike Computer Mount Out-Front with Multiple Bases stood out because of its solid compatibility with various devices and quick, tool-free setup—perfect for unpredictable mountain conditions. Its central extension design means your data is always in sight without interfering with steering, making long climbs smoother.
It’s lightweight, robust, and fits different scenarios—whether I’m monitoring my speed or attaching a GoPro for scenic shots. Compared to other mounts, it’s more flexible and user-friendly, especially with options for titanium, carbon fiber, or nylon, based on your needs or budget. Trust me, this one transforms your Teide ride into a safer, more efficient adventure. It’s the best choice for serious cyclists wanting reliability and ease during their toughest climbs.
Top Recommendation: ROCKBROS Bike Computer Mount Out-Front with Multiple Bases
Why We Recommend It: This mount excels with versatile compatibility, including multiple bases for different devices, and provides a better viewing angle with its central extension design. Its quick-release titanium, carbon fiber, or nylon options cater to different durability and weight needs, unlike the other options mainly focused on storage or wall mounting. Its practical, tool-free installation makes it ideal for high-mountain rides like Mount Teide, where quick adjustments matter.
Best cycling route up mount teide: Our Top 4 Picks
- ROCKBROS Bike Computer Mount Out-Front with Multiple Bases – Best for Navigating the Best Cycling Route Teide Volcano
- Feedback Sports Velo Wall Post Bike Storage Mount – Best for Organizing Your Ride in the Best Cycling Trail Teide National Park
- Delta Cycle Rugged 2 Bike Rack, Wall-Mount, Holds 100 lbs – Best for Securing Bikes on the Best Mountain Biking Route Teide
- Delta Cycle Two Bike Gravity Pole Stand Garage – Best for Displaying Bikes on the Best Scenic Cycling Route Teide
ROCKBROS Bike Computer Mount Out-Front with Multiple Bases
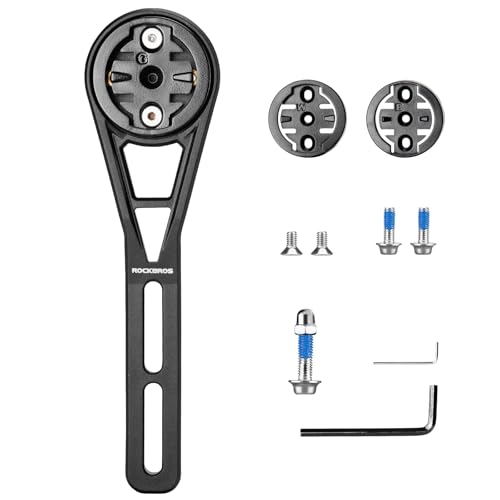
- ✓ Versatile multiple bases
- ✓ Easy to install
- ✓ Strong material options
- ✕ Slightly pricey
- ✕ Limited color choices
| Compatibility | Supports mainstream watch tables, expandable for car lights and GOPRO cameras |
| Material Options | Nylon, carbon fiber, titanium alloy |
| Installation Method | Uses a 2/3 mm hex wrench for quick replacement and adjustment |
| Design Features | Center-extended handlebar for better viewing angle |
| Adaptability | Suitable for daily commuting, outdoor cycling, and safety equipment mounting |
| Maximum Load Capacity | Inferred to support typical cycling devices; specific weight limit not specified |
As I snugged the ROCKBROS Bike Computer Mount Out-Front onto my handlebars, I immediately appreciated how the central extension gave my screen a perfect, unobstructed view. That extra inch of reach meant I didn’t have to lean forward awkwardly or strain my neck to see my speed or navigation data.
The three included bases felt like a smart, versatile design choice. Switching between my smartwatch, a GoPro, or a bike light was seamless—no tools needed, thanks to their quick-disconnect system.
I especially liked how the titanium alloy model felt sturdy yet lightweight, making adjustments feel solid without adding bulk.
Installation was a breeze. A simple 2/3 mm hex wrench was all I needed to swap out bases or tighten screws.
Even if you’re not super handy, you’ll find this setup intuitive and quick to get right. It’s a relief not to struggle with complicated mounting systems during a ride.
The materials offered plenty of options—carbon fiber for lightweight needs, nylon for budget-conscious riders, or titanium for maximum strength. I went with carbon fiber for a good balance of weight and durability, and it didn’t disappoint.
What really impressed me was how adaptable this mount feels. Whether I’m on a daily commute, tackling a mountain route like Mount Teide, or just out for a fun ride, it stays secure and flexible.
Plus, the full practicality of mounting accessories like lights or cameras makes it a true all-in-one solution.
Overall, this mount feels well-made, flexible, and super user-friendly. It’s a small upgrade that significantly enhances the riding experience—more visibility, better safety, and less hassle.
Feedback Sports Velo Wall Post Bike Storage Mount

- ✓ Space-saving fold design
- ✓ Protects bike with rubber
- ✓ Easy to install and use
- ✕ Limited to wall studs
- ✕ Slightly pricey
| Supported Bike Types | Road, cyclocross, mountain, and electric bikes |
| Maximum Load Capacity | 50 pounds (22.7 kg) |
| Mounting Compatibility | Standard wall studs with included hardware |
| Lock Port | 1-inch diameter for bike lock integration |
| Foldable Design | Yes, folds up for space-saving storage |
| Arm Padding | Rubber-coated contact points to prevent scratches |
Ever wrestled with trying to find a secure spot for your bike in a small apartment or cluttered garage? I’ve been there—struggling with bikes leaning awkwardly against walls or taking up too much space.
That’s until I installed the Feedback Sports Velo Wall Post.
This wall mount is surprisingly sturdy and easy to install. The included hardware screws into standard wall studs, and I appreciated how solid it felt once mounted.
The rubber-coated arms are gentle but firm, preventing scratches on my bike’s frame and wheels. It holds my mountain bike and road bike without any wobbling or slipping.
What really stood out is how compact and foldable it is. When not in use, I simply fold it up, keeping my space tidy and uncluttered.
It’s perfect for tight areas like my apartment corner or garage corner. Plus, the 1-inch lock port is a nice touch—adding a layer of security if I want to lock my bike to the mount.
Loading and unloading bikes is straightforward thanks to the adjustable arms and generous 50-pound capacity. I can easily hang my e-bike or cyclocross bike without worry.
It’s a versatile and sleek solution that keeps my bike accessible yet out of the way.
Overall, I found this bike mount to be a game-changer for small spaces. It’s reliable, space-saving, and protects my bike from damage—exactly what I needed.
If you’re tired of bikes cluttering your living space, this could be the fix.
Delta Cycle Rugged 2 Bike Rack, Wall-Mount, Holds 100 lbs

- ✓ No drilling required
- ✓ Adjustable for all bike sizes
- ✓ Stylish durable finish
- ✕ Less secure for very bouncy bikes
- ✕ Slightly expensive
| Maximum Load Capacity | 100 lbs (50 lbs per bike) |
| Bike Compatibility | Suitable for bikes up to 50 lbs and various sizes/styles |
| Material | Steel with powder-coated finish |
| Dimensions | 86 inches x 24 inches x 16 inches |
| Mounting Type | Wall-lean, no permanent mounting or drilling required |
| Adjustable Arms | Yes, to accommodate different bike sizes and styles |
Compared to the typical wall-mounted bike racks I’ve tried, the Delta Cycle Rugged 2 stands out for its unique gravity-based design. You don’t need to drill holes or permanently attach anything, which is a game-changer for renters or those wary of wall damage.
I was impressed by how easily it leans against the wall, yet feels surprisingly stable. The steel frame has a sleek, durable finish that looks nice even in a modern garage or apartment corner.
The adjustable arms are a thoughtful touch, letting you fit bikes of different sizes without fuss.
Setting it up was a breeze—just a screwdriver and a few minutes, and I was ready to go. The rubber-coated arms and feet helped keep my bikes secure and protected from scratches.
Plus, the compact footprint means I can store two bikes vertically without sacrificing too much space.
What I really liked is how versatile this rack is. It easily accommodates heavier e-bikes up to 50 lbs each, which is often a problem with other racks that are only rated for regular bikes.
And because it’s free-standing, I can move it around if needed—no permanent mounting required.
One small drawback is that the leaning design might feel a bit less secure if you have very aggressive or bouncy riding styles. Also, at $134, it’s a bit pricier than some simpler wall hooks, but the convenience and build quality justify the cost.
Delta Cycle Two Bike Gravity Pole Stand Garage

- ✓ Adjustable arms fit almost any bike
- ✓ Stable and secure hold
- ✓ Compact and space-saving
- ✕ Slightly fiddly for odd frames
- ✕ Limited to 66-pound bikes
| Maximum Load Capacity | 66 lbs (30 kg) |
| Adjustable Arms | Independently adjustable to fit various bike sizes |
| Compatibility | Suitable for almost any bike type |
| Brand | Delta Cycle & Home |
| Price | USD 63.98 |
As I unboxed the Delta Cycle Two Bike Gravity Pole Stand, I immediately noticed how sturdy and well-made it felt in my hands. The adjustable arms moved smoothly, making it easy to customize for different bike sizes.
I was curious to see how well it would hold heavier bikes, so I tested it with a 66-pound mountain bike.
Setting it up in my garage was straightforward. The arms easily adjusted to fit my bike’s frame, and I appreciated how securely it held without wobbling.
The independent adjustment of each arm means I can park bikes of various styles and sizes comfortably. It’s pretty compact, so it didn’t take up much space, which is great for my crowded garage.
During extended use, I found the stand very stable, even when I was changing tires or giving my bike a quick clean. The design makes it easy to access all parts of the bike without knocking over other stored bikes.
I like that it’s rated for bikes up to 66 pounds — I’ve used it with both lightweight road bikes and heavier mountain bikes without any issues.
One thing to note is that the arms are quite adjustable, but you might need to fiddle with them a bit to get the perfect fit for very unusual frame shapes. Overall, it’s a reliable, space-efficient solution that keeps my bikes off the floor and ready to ride.
What Are the Different Routes to Cycle Up Mount Teide?
The best cycling routes up Mount Teide offer cyclists unique challenges and stunning views.
- La Orotava Route: This route begins in the picturesque town of La Orotava and climbs steadily towards the Teide National Park. The ascent is gradual but provides breathtaking views of the surrounding landscape, making it a favorite among cyclists looking for a scenic experience.
- Los Cristianos Route: Starting from the coastal town of Los Cristianos, this route features a more challenging climb as cyclists navigate through varying terrains. The initial descent offers a chance to enjoy the coastline before facing the rigorous ascent towards Mount Teide, appealing to more experienced riders.
- Vilaflor Route: This route starts in Vilaflor, one of the highest villages in Spain, leading cyclists through lush forests and rocky landscapes. The climb is demanding, but the diverse scenery and the cooler temperatures at higher altitudes make it a refreshing choice for those seeking adventure.
- Teide National Park Route: This route allows cyclists to ride directly within the national park, with access to various trails and viewpoints. The combination of volcanic landscapes and unique flora creates a captivating environment, and the route offers several options for cyclists looking to customize their experience based on skill level.
- La Esperanza Route: Starting in La Esperanza, this route is less traveled and provides a more secluded experience. The road winds through pine forests and offers a steady climb, making it ideal for those who prefer a quieter ride with the chance to enjoy nature away from the busier routes.
Which Route Offers the Best Views While Climbing?
The best cycling routes up Mount Teide offer stunning views and unique experiences for cyclists of all levels.
- Route from La Orotava: This route allows cyclists to experience the lush forests and volcanic landscapes.
- Route from Vilaflor: Known for its challenging ascent, this path provides breathtaking panoramic views of the island.
- Route from Los Cristianos: A longer, scenic ride that showcases coastal views before the climb.
- Route from Santiago del Teide: This route offers a more gradual ascent with beautiful vistas of the surrounding valleys.
Route from La Orotava: This route begins in the picturesque town of La Orotava, where cyclists can enjoy the rich biodiversity of the surrounding area. As you ascend, the transition from lush greenery to stark volcanic landscapes creates a stunning visual contrast that is captivating.
Route from Vilaflor: Starting from the highest village in Spain, Vilaflor, this route is renowned for its steep gradients and challenging climbs. The effort is rewarded with magnificent views of the Teide National Park and the surrounding landscape, especially as you gain altitude.
Route from Los Cristianos: This longer route starts near the coast, providing cyclists with the chance to enjoy the beauty of the ocean before embarking on the climb up the mountain. The diverse scenery along the way, including coastal cliffs and valleys, makes this a favorite among cyclists who appreciate varied landscapes.
Route from Santiago del Teide: This route offers a more gradual ascent compared to others, making it suitable for less experienced cyclists. The ride is marked by beautiful views of the valleys and mountains, allowing for a more relaxed and scenic cycling experience as you approach Mount Teide.
What Is the Easiest Route for Beginner Cyclists?
When seeking an accessible route for beginner cyclists tackling Mount Teide, the Las Cañadas route is often recommended. This route offers a manageable gradient and spectacular views, making it suitable for those new to cycling at high altitudes.
Key features of the Las Cañadas route include:
- Starting Point: Begin at La Orotava or Puerto de la Cruz, both providing access to the base of Mount Teide.
- Distance: Approximately 40 kilometers round trip.
- Elevation Gain: The ascent is gradual, around 1,200 meters, offering a steady climb that allows beginners to acclimatize at their own pace.
- Terrain: The road is well-paved and maintained, minimizing the risk of punctures or fall hazards.
- Scenic Views: Cyclists are treated to breathtaking panoramic views of the surrounding landscape, including volcanic rock formations and lush valleys.
- Rest Stops: Multiple viewpoints along the way provide excellent opportunities for breaks and photography.
This route not only builds stamina and confidence but also allows beginners to experience the stunning natural beauty of Tenerife. Always remember to check weather conditions and bring essential gear, including hydration and sun protection.
Which Route Is Considered the Most Challenging?
The most challenging cycling route up Mount Teide is often considered to be the following options:
- Teide National Park Route: This route covers a distance of approximately 40 kilometers and ascends to an altitude of 2,300 meters.
- La Esperanza to Teide Route: This challenging route spans around 60 kilometers and features steep gradients and sharp bends.
- Vilaflor to Teide Route: Starting from one of the highest villages in Spain, this route is about 30 kilometers long with significant elevation gain.
Teide National Park Route: This route is renowned for its breathtaking scenery and challenging ascent, making it popular among experienced cyclists. The journey starts at sea level and requires cyclists to navigate through various terrains, ultimately culminating at the observatory near the summit. The altitude gain and extended distance can test even the most seasoned riders.
La Esperanza to Teide Route: Known for its demanding climbs and twists, this route offers a rigorous workout for cyclists. The path transitions from lush forested areas to arid volcanic landscapes, providing a diverse visual experience while pushing physical limits. Riders must be prepared for steep inclines and the need for stamina to complete this route.
Vilaflor to Teide Route: Starting from the picturesque village of Vilaflor, this route is less traveled but equally challenging. It features a combination of steep climbs and stunning views of the surrounding landscape, making it a favorite among those seeking a more secluded ride. The elevation gain from Vilaflor adds to the difficulty but rewards cyclists with an exhilarating sense of achievement upon reaching the summit.
What Key Factors Should You Consider When Choosing a Route?
When choosing the best cycling route up Mount Teide, several key factors should be taken into consideration:
- Elevation Gain: Understanding the total elevation gain is crucial as it significantly affects the difficulty of the route. Mount Teide is one of the highest peaks in Spain, so routes with higher elevation gains will be more challenging, requiring good physical condition and stamina.
- Route Length: The overall distance of the route will impact your cycling experience. Longer routes may require more time and energy, so it’s important to choose a distance that matches your fitness level and available time for the ride.
- Road Condition: The quality of the road surface can greatly affect your cycling performance. Smooth, well-maintained roads are preferable for a more enjoyable ride, while rough or gravel paths can make the journey more challenging and may require specific types of bicycles.
- Weather Conditions: Weather can change rapidly in mountainous areas, so it’s essential to check the forecast before embarking on your ride. Factors like temperature, wind speed, and precipitation can impact both safety and comfort during the ride.
- Traffic Levels: The amount of vehicle traffic on the route is a crucial safety consideration. Routes with lower traffic levels are generally safer for cyclists, allowing for a more pleasant experience without the stress of navigating around cars.
- Scenic Value: The visual appeal of the route can enhance your cycling experience. Routes that offer stunning views of the landscape, unique geological features, or wildlife can make the climb more rewarding and enjoyable.
- Access to Amenities: Availability of rest stops, water sources, and food along the route can be a significant factor, especially on longer rides. Knowing where you can take breaks and refuel can help you plan your ride more effectively.
How Does Elevation Impact Your Cycling Experience?
Temperature Changes: Elevation can lead to cooler temperatures, which may require cyclists to dress appropriately and adjust their hydration strategies. Riders should be prepared for sudden drops in temperature, especially during descents, and ensure they stay warm enough to maintain performance and comfort.
Weather Conditions: Weather can vary dramatically with elevation, with the possibility of encountering rain, wind, or even snow, impacting the cycling experience and safety. Cyclists should always check the forecast and be prepared for rapidly changing conditions, which could affect visibility and road conditions along their route.
What Are the Weather Considerations for Cycling Up Mount Teide?
When cycling up Mount Teide, various weather considerations can significantly impact your experience and safety.
- Temperature Variations: The temperature can vary greatly from the base to the summit of Mount Teide. At lower elevations, it may be warm and pleasant, but as you ascend, temperatures can drop significantly, especially at higher altitudes, necessitating appropriate clothing layers.
- Wind Conditions: Wind speeds can increase dramatically as you climb, particularly near the summit. Strong winds can make cycling difficult and may result in a loss of balance or control, so it is crucial to check wind forecasts and be prepared for sudden gusts.
- Precipitation Chances: Rain can occur unexpectedly, especially in the summer months, which can make the roads slippery and hazardous. It’s essential to monitor weather forecasts for rain and have waterproof gear on hand to ensure a safe ride.
- Altitude Effects: As you ascend to higher altitudes, the air becomes thinner, which can affect your breathing and performance. It’s important to acclimatize properly before attempting the ride to avoid altitude sickness.
- Sun Exposure: The UV index can be significantly higher at altitude, increasing the risk of sunburn. Wearing sunscreen and protective clothing is advisable, along with carrying ample water to stay hydrated.
What Preparations Are Essential for Cycling Up Mount Teide?
Preparing for cycling up Mount Teide involves several essential items to ensure a safe and enjoyable experience.
- Proper Bike Selection: Choosing a lightweight road bike or a high-quality mountain bike is crucial for climbing steep gradients effectively. Bikes with a wide gear range will allow for easier pedaling on the challenging ascent.
- Hydration System: Staying hydrated is vital during the ride, especially given the altitude and potential heat. A hydration pack or water bottles mounted on the bike will help you maintain fluid intake throughout the journey.
- Nutritional Supplies: Carrying energy bars, gels, or snacks is essential to replenish energy during the climb. Consuming small amounts of food at regular intervals will help maintain stamina and avoid fatigue.
- Weather-Appropriate Clothing: The weather can change rapidly on Mount Teide, so dressing in layers is important. Lightweight, moisture-wicking clothing combined with a windproof jacket can help regulate body temperature during the ride.
- Navigation Tools: Having a GPS device or a smartphone with a cycling app is recommended to stay on course. Pre-downloading the best cycling route up Mount Teide ensures you won’t get lost and can enjoy the scenery.
- Repair Kit: A basic repair kit including tire levers, a spare tube, and a mini-pump is essential for dealing with any mechanical issues. Being prepared for flat tires or minor bike adjustments will save time and frustration during your ride.
- Physical Conditioning: Prior physical training is necessary to tackle the demanding climb. Focusing on endurance and strength training prior to your trip will prepare your body for the physical challenges of cycling at high altitudes.
- Sun Protection: Sunscreen, sunglasses, and a cap are important for protecting your skin and eyes from the intense sun at higher elevations. UV rays are stronger at altitude, making sun protection a vital part of your preparation.
What Should You Pack for a Day of Cycling?
When planning a day of cycling, especially on a challenging route like Mount Teide, it’s important to pack the right essentials for a safe and enjoyable experience.
- Water Bottle: Staying hydrated is crucial, particularly in the warmer climate around Mount Teide. A durable, insulated water bottle can help maintain the temperature of your drink, whether you prefer it cold or at room temperature.
- Snacks: Quick energy snacks such as energy bars, nuts, or dried fruits are essential to keep your energy levels up during the ride. These snacks are lightweight and easy to pack, allowing for quick access when you need a boost.
- Repair Kit: A basic repair kit including tire levers, a spare tube, and a multi-tool can save you from being stranded if you experience a flat tire or minor mechanical issues. Knowing how to use these tools is equally important, so consider practicing before your ride.
- First Aid Kit: Accidents can happen, so having a small first aid kit with band-aids, antiseptic wipes, and pain relief can be invaluable. It’s better to be prepared for minor injuries or discomfort during your cycling adventure.
- Sun Protection: Sunscreen and sunglasses are vital, even on cooler days, as UV rays can still be harmful. Opt for a high SPF sunscreen that is sweat-resistant to protect your skin while cycling, and choose sunglasses with UV protection to shield your eyes from glare and harmful rays.
- Appropriate Clothing: Wear moisture-wicking, breathable clothing that can keep you comfortable throughout your ride. Layering is also advisable, as temperatures can vary significantly, especially when ascending Mount Teide.
- Navigation Tools: A GPS device or a smartphone with a cycling app can help you stay on track while exploring the best cycling routes. Familiarize yourself with the route beforehand and consider downloading offline maps in case of poor signal.
- Bike Lock: If you plan to stop and explore areas along the route, a lightweight bike lock will allow you to secure your bike safely. This can provide peace of mind when taking breaks or visiting attractions.
How Should You Train for the Climb?
Hill repeats are a specific training technique where you repeatedly climb a hill to build strength and improve your climbing efficiency, mimicking the challenges you will face on the mountain.
Strength training can include exercises such as squats and lunges, which target key muscle groups used in cycling, allowing you to generate more power and maintain a higher cadence during climbs.
Interval training involves alternating between high-intensity bursts of cycling and periods of rest, which can enhance your anaerobic capacity, allowing you to tackle steep sections of the climb more effectively.
Nutrition and hydration are critical; fueling your body with the right balance of carbohydrates, proteins, and fats, as well as staying hydrated, will help sustain your energy levels during both training sessions and the actual climb.
What Are the Best Practices for Safety While Cycling Up Mount Teide?
The best practices for safety while cycling up Mount Teide include preparing adequately, wearing appropriate gear, and being aware of the environment.
- Plan Your Route: Before starting your ascent, it’s essential to familiarize yourself with the best cycling route up Mount Teide. Researching elevation changes, road conditions, and points of interest can help in preparing for the ride and ensuring a smoother experience.
- Check Weather Conditions: Weather in mountainous areas can change rapidly, so always check the forecast before your ride. Being aware of temperature drops, potential rain, or strong winds will allow you to dress appropriately and avoid dangerous conditions.
- Wear Safety Gear: Always wear a helmet and consider additional protective gear like gloves and padded shorts. This gear not only protects against injuries but also enhances comfort during the long ride up the mountain.
- Stay Hydrated and Nourished: Bring enough water and energy snacks to keep your energy levels up throughout the ride. Dehydration and fatigue can significantly affect your performance and safety, especially in higher altitudes.
- Cycling Skills and Fitness Level: Ensure that you have the necessary cycling skills and physical conditioning to tackle the ascent. Training in advance and understanding your limits will help prevent accidents and exhaustion.
- Use Proper Lighting and Visibility Gear: In case of low visibility due to weather or time of day, make sure your bike is equipped with lights and that you wear reflective clothing. This enhances your visibility to other road users and helps prevent accidents.
- Ride with a Partner or Group: Cycling with others can increase safety, as there is support in case of an emergency. Having company also makes the experience more enjoyable and less isolating, especially on challenging routes.
What Should You Do in Case of an Emergency?
In case of an emergency while cycling up Mount Teide, it’s essential to be prepared and know the appropriate steps to take.
- Stay Calm: Keeping a clear head is crucial in emergencies as it allows you to think rationally and assess the situation effectively.
- Assess the Situation: Determine the nature of the emergency, whether it’s a mechanical issue, injury, or severe weather, to decide the best course of action.
- Use Your Phone: If possible, contact emergency services or someone who can help; make sure your phone is charged and has service.
- Provide First Aid: If injuries are involved, administer basic first aid if you are trained, and ensure that you stabilize the injured person until help arrives.
- Signal for Help: If you cannot contact anyone, use visible signals such as bright clothing or a whistle to attract attention from other cyclists or hikers.
- Know Your Location: Familiarize yourself with the area and use landmarks or GPS to inform rescuers of your exact location, which is especially important in remote areas like Mount Teide.
- Stay Hydrated and Warm: If you are stuck for a while, conserve energy, stay hydrated, and protect yourself from the elements to prevent further complications.
Staying calm allows you to think clearly when faced with unexpected situations. Assessing the situation helps you identify the specific issue at hand, whether it’s a flat tire, injury, or change in weather conditions. Using your phone to contact emergency services or friends can facilitate a quicker response to your emergency. If someone is injured, providing first aid can stabilize their condition until professional help arrives.
In a situation where communication isn’t possible, signaling for help can attract the attention of others who may assist you. Knowing your location is vital, especially in vast landscapes like Mount Teide, where help may be far away. Finally, staying hydrated and warm can be life-saving measures while waiting for assistance, as they prevent physical deterioration in challenging conditions.
How Can You Stay Hydrated and Fueled During the Ride?
Staying hydrated and fueled during a ride, especially on challenging routes like the best cycling route up Mount Teide, is crucial for performance and enjoyment.
- Water: It is essential to carry enough water to stay hydrated throughout the ride, especially in the dry climate of Tenerife.
- Electrolyte Drinks: Consuming drinks that replenish electrolytes helps maintain balance and prevent cramps during long rides.
- Energy Bars: Portable energy bars provide quick carbohydrates and are easy to digest, making them ideal for on-the-go fueling.
- Fruits: Fresh fruits like bananas or dates offer natural sugars and hydration, making them excellent snacks during breaks.
- Gels and Chews: Energy gels and chews are concentrated sources of carbohydrates that can be consumed quickly for an instant energy boost.
Water is the most fundamental component of hydration; cyclists should aim to drink regularly, especially before feeling thirsty, to prevent dehydration while tackling the steep climbs of Mount Teide.
Electrolyte drinks are particularly beneficial in hot weather, helping to replace sodium, potassium, and other vital minerals lost through sweat, thus keeping muscle function optimal during the ride.
Energy bars are not only convenient but also packed with calories and nutrients, allowing cyclists to sustain energy levels without the bulkiness of traditional food.
Fruits provide hydration and essential vitamins, while their natural sugars offer a quick source of energy, making them not just healthy but also refreshing during breaks.
Gels and chews are designed for quick consumption and can be easily packed, making them perfect for cyclists needing a rapid energy source without stopping for a full meal.
Related Post: